
Piercing Aftercare
At Dorje Adornments, we understand that the aftercare and healing journey is as important as the piercing experience.
Piercing care
Spray your piercing twice daily, front and back, for five seconds with a sterile saline. We suggest making it a part of your morning and evening routine!
Dry your piercing anytime it gets wet, including after spraying your piercing with sterile saline wound wash or after showering. A blow dryer set on cold or low works great!

Try to avoid
Touching, twisting, or rotating your piercing!
Sleeping on your piercing.
Bumping, snagging, or hitting your piercing. Be cautious with towels and blankets!
Getting personal care products such as makeup, moisturizer, sunblock, serums etc. on your piercing.
Do not use
Rubbing alcohol, hydrogen peroxide, antibiotic ointments, or tea tree oil!
Cotton swabs or cotton balls to clean your piercing (The fibers can wrap around your jewelry and cause healing problems).
Ear-care solution. The only thing we suggest for use on piercings is sterile saline (and water).
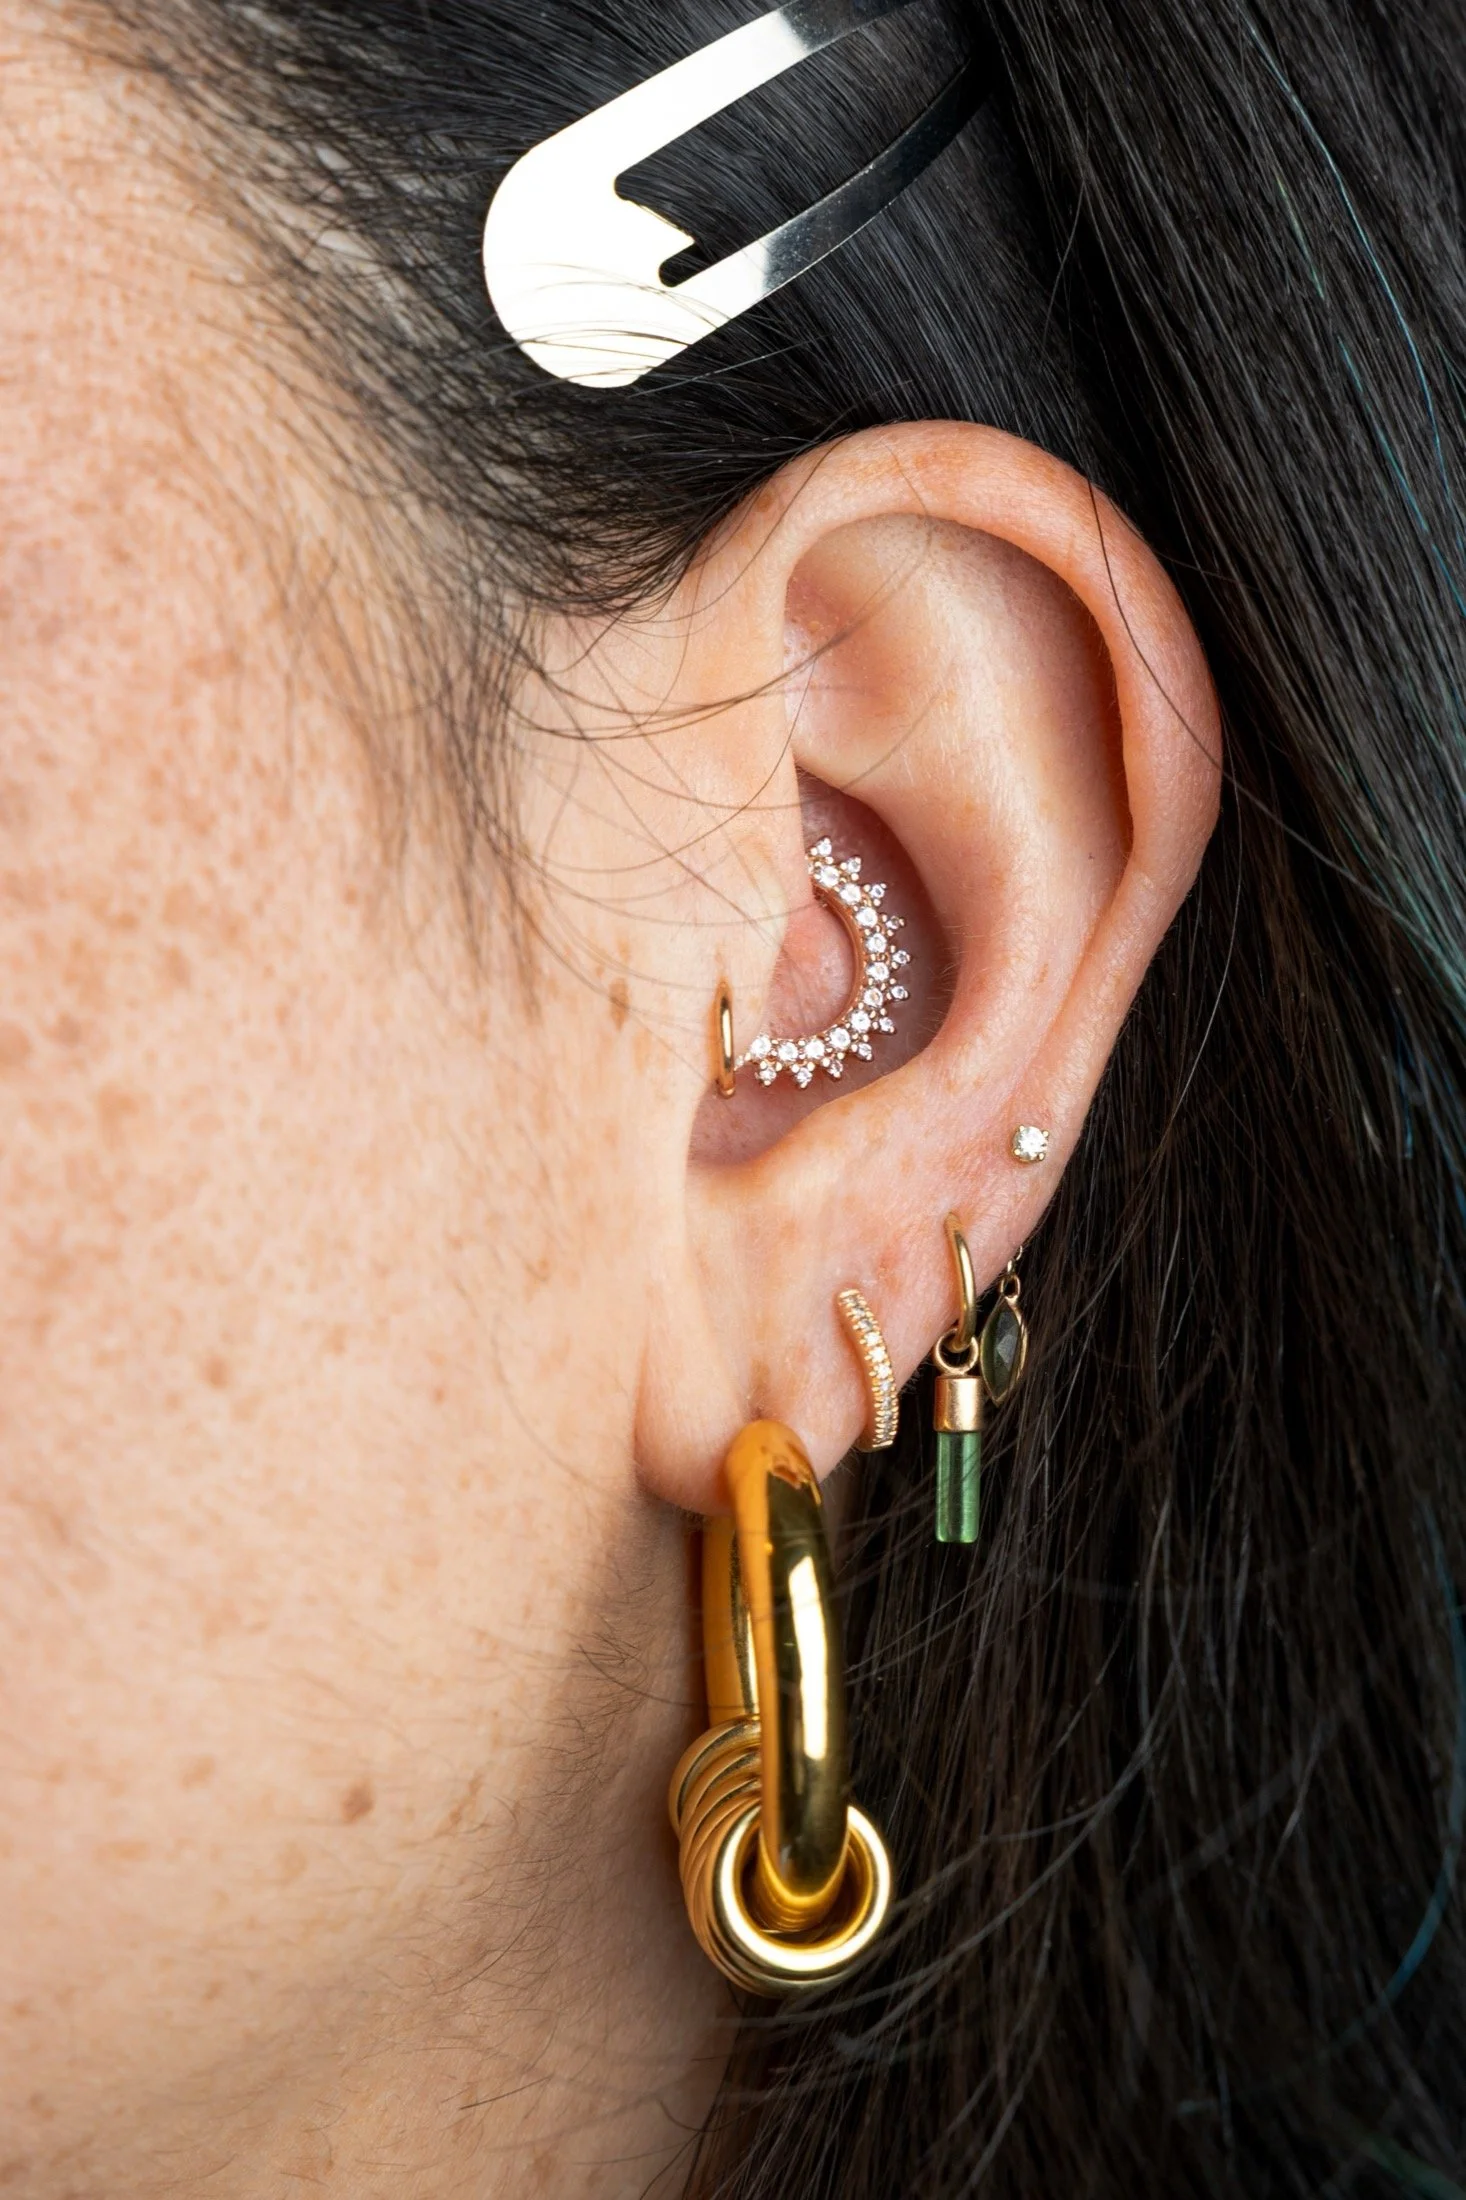
Downsizing
Our jewelry comes in two pieces — The decorative front piece and the back post it secures into.
After the initial healing period and once most of the swelling has gone down, you should begin to notice some additional length on your post.
At that point you’re ready to have us insert a shorter post in your healing piercing. To make it even easier, you’ll receive an email to book with us directly when it’s time.
Shortening your post is a crucial part of the healing process as a longer post can cause irritation, the angle of the piercing to permanently shift, or both.
Considerations
Avoid immersing your piercing in shared bodies of water or swimming for the entire healing period (shower water is great, open bodies of water are not)!
We recommend not getting pierced if you plan to fly within 4-6 weeks. The altitude pressure from airplanes can cause excess swelling and discomfort.
FAQs
-
We take great care in ensuring your new piercing is angled perfectly perpendicular to your tissue for the best look and optimal healing.
When you sleep on your piercing , you put prolonged pressure on it, encouraging the angle of your piercing to permanently shift.There is no solution for an angled piercing other than redoing the piercing and starting the healing process over.
If you’re concerned, one solution is purchasing a travel or piercing pillow online. You can lay on the pillow with your ear through the hole, ensuring no pressure is placed on your piercing.
-
Twice a day, no more, no less! Cleaning more than twice a day consistently can cause some irritation or moisture buildup.
Remember: spray the front and the back, dry well, and do not touch your piercing.
If you struggle to remember, tie the process into one of your existing routines like washing your face or brushing your teeth.
-
We take great care in ensuring your new piercing is angled perfectly perpendicular to your tissue for the best look and optimal healing.
When you sleep on your piercing, you put prolonged pressure on it, encouraging the angle of your piercing to permanently shift.There is no solution for an angled piercing other than redoing the piercing and starting the healing process over.
If you’re concerned, one solution is purchasing a travel or piercing pillow online. You can lay on the pillow with your ear through the hole, ensuring no pressure is placed on your piercing.
-
We highly advise against the use of anything other than sterile saline or water on a fresh piercing. Many of these solutions can be too harsh, dry out the piercing, discolor or damage your jewelry, or cause a chemical burn on the area surrounding your piercing. The perceived reward is not worth the risk.
If you are having issues with a piercing, please reach out to us and we can have a piercer troubleshoot with you.
-
We advise against the use of Q-tips or other fibrous material like cotton balls on your piercing. These items can leave fibers on your jewelry or piercing which can build up, causing excess irritation.
Water or saline works great to soften any buildup or debris, and the pressure from the running water in the shower typically rinses it away.
Downsizing
(SHORTENING YOUR POST)
The way that your piercing heals is just as important as the initial experience. Downsizing (shortening the length of your stud’s post) helps to prevent irritation and preserve the angle of the piercing:

Initial Piercing
When you're pierced with a stud, we start with a longer post. This ensures your piercing has enough room to accommodate the swelling that we typically see during the initial healing period.
For the first few days or even first weeks, you may notice any swelling and the post may appear long. Keep an eye on your piercing and be extra cautious of snagging during this stage.

Swelling
Swelling typically happens within the first few weeks, so keeping a longer post during this timeframe is important. With proper aftercare and not sleeping on the piercing, you’ll notice that swelling will subside and your post will feel long again.
Depending on which piercing you received, the timeframe for swelling will vary. We will prepare you with that timeline and send you an email reminder when it’s time to come back in!

Downsizing
When you come back for your downsize, your piercer will assess your piercing to see if you are ready for a shorter post, if you are, they will fit you with a shorter post that is perfectly tailored to your anatomy.
Once your post is downsized, the piercing will appear flush against the skin and typically stays at that length for the life of the piercing.
Not Downsizing
Having a well-fitted post not only makes your piercing look better, but it prevents the post moving through the piercing channel which can cause residual irritation, and more importantly, it prevents the piercing angle from shifting.
The only way to correct the angle of a piercing that has shifted is by redoing the piercing completely.
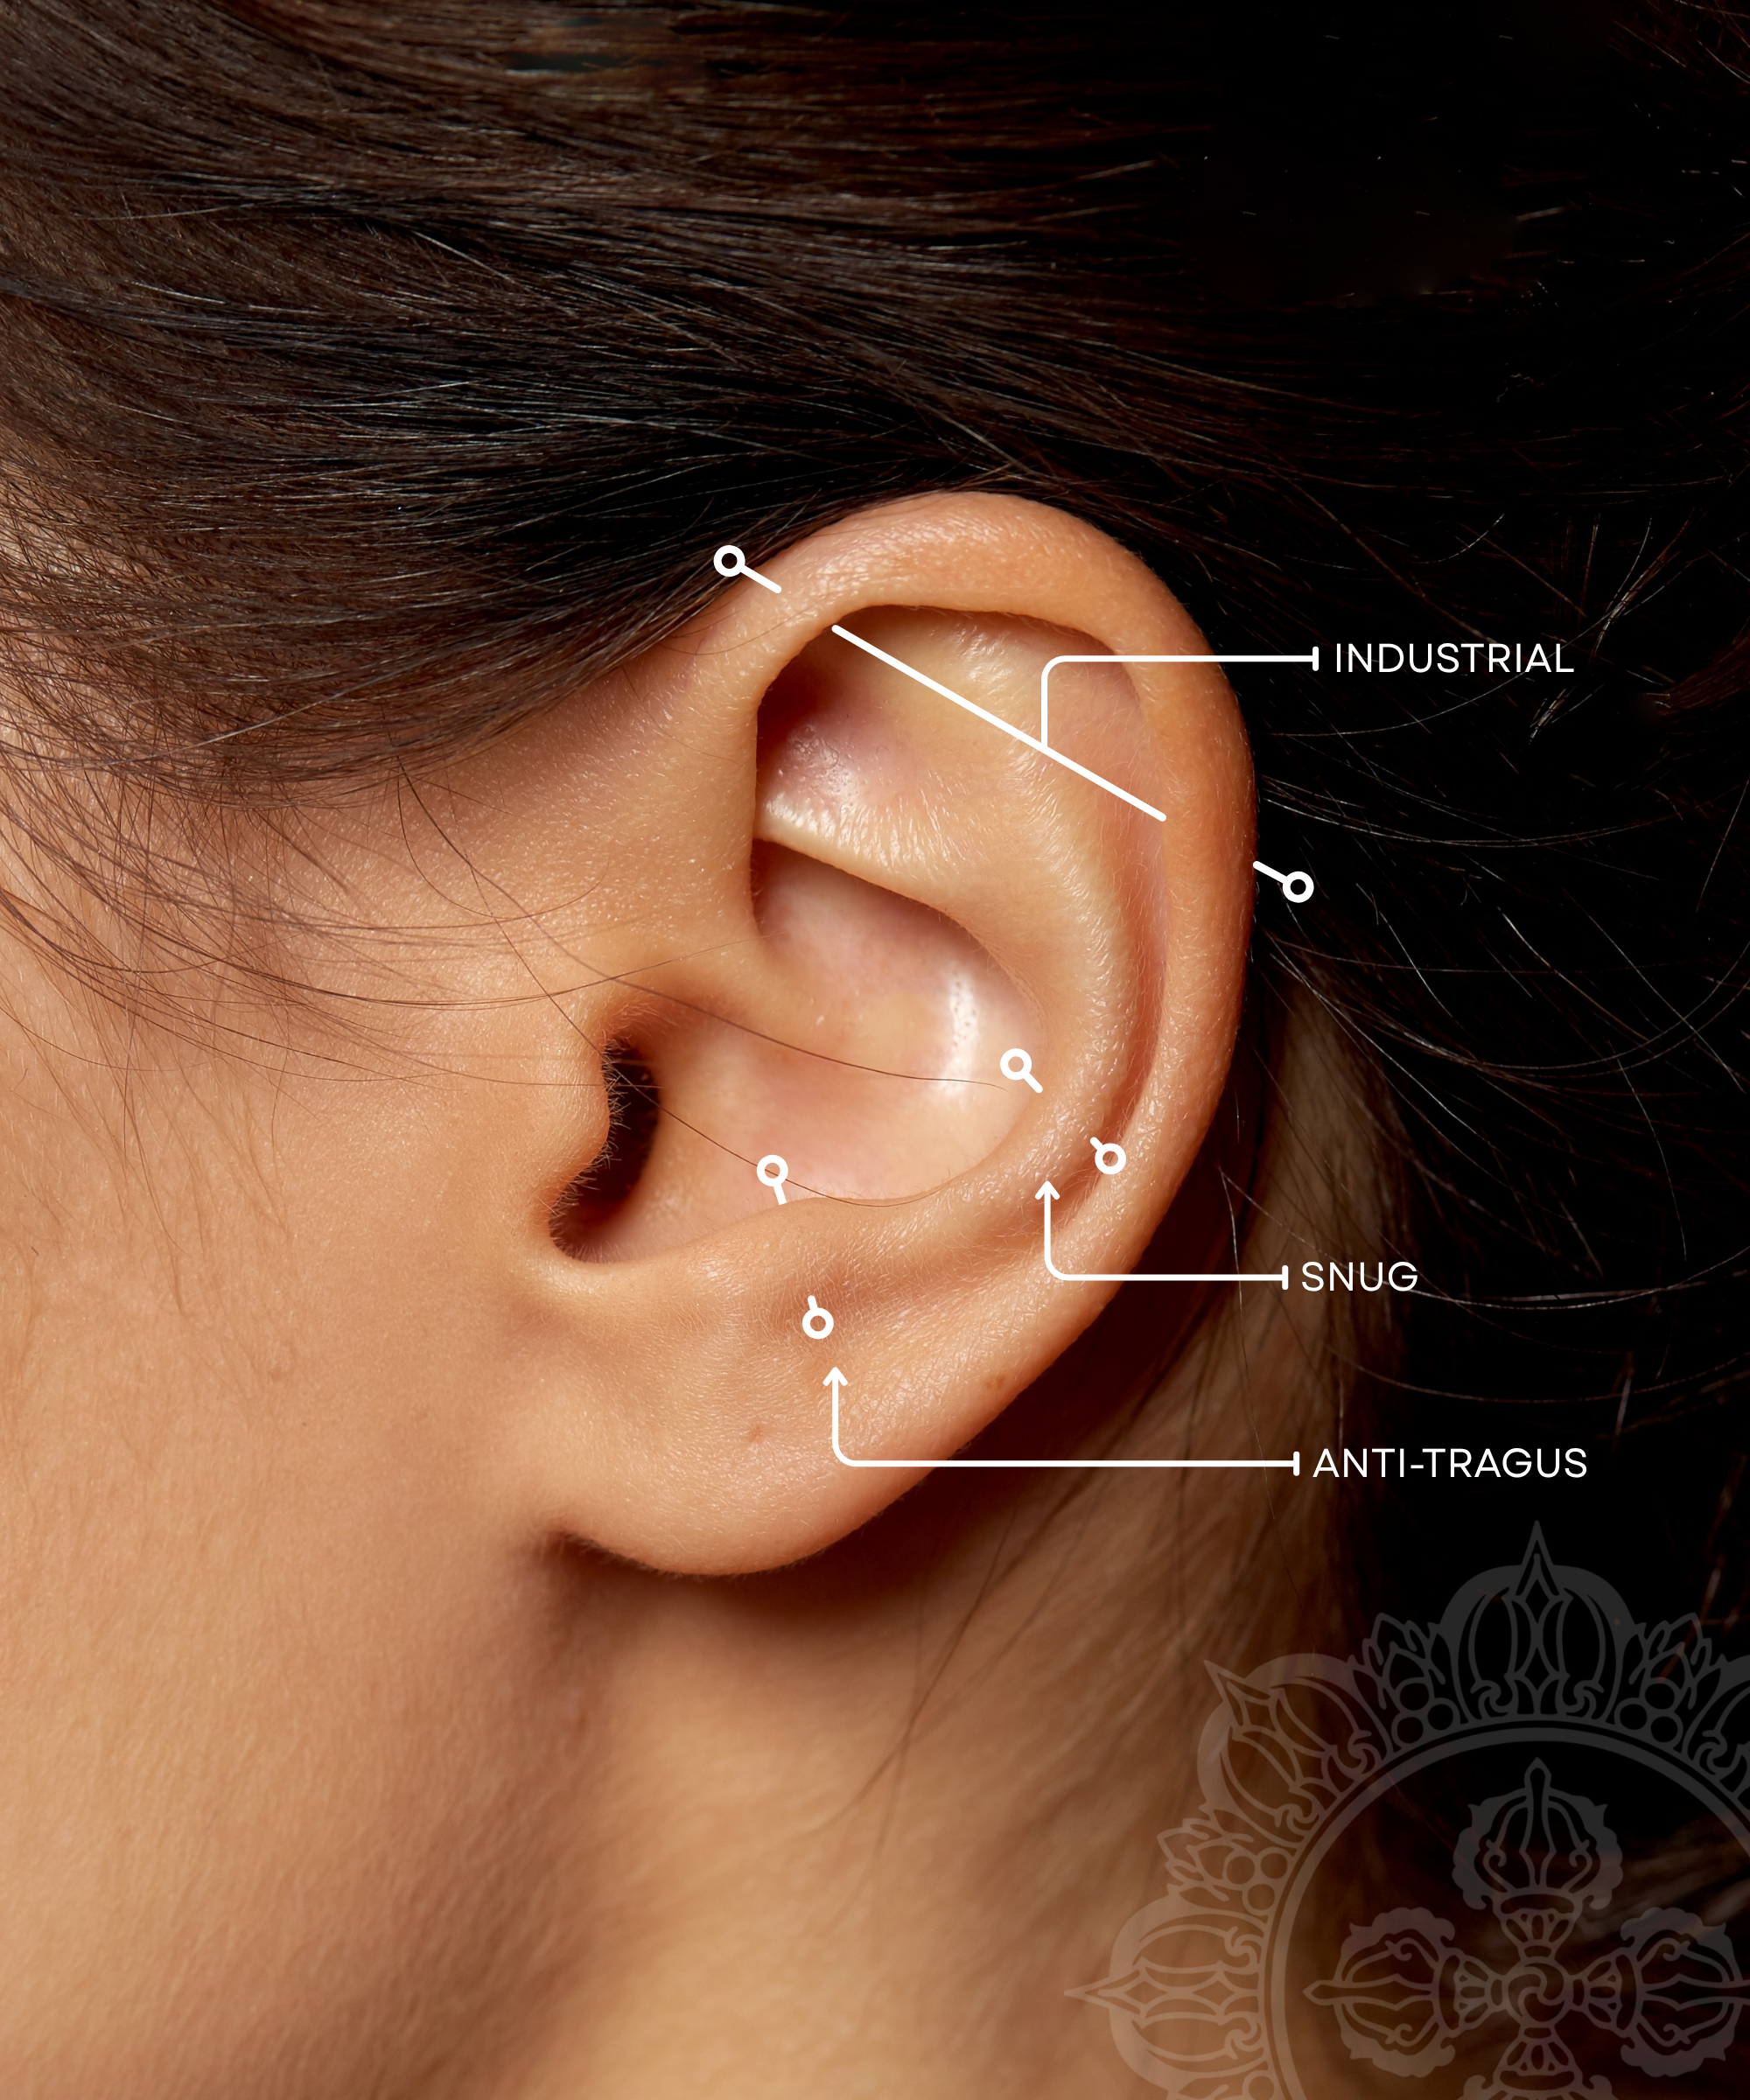
Healing Times
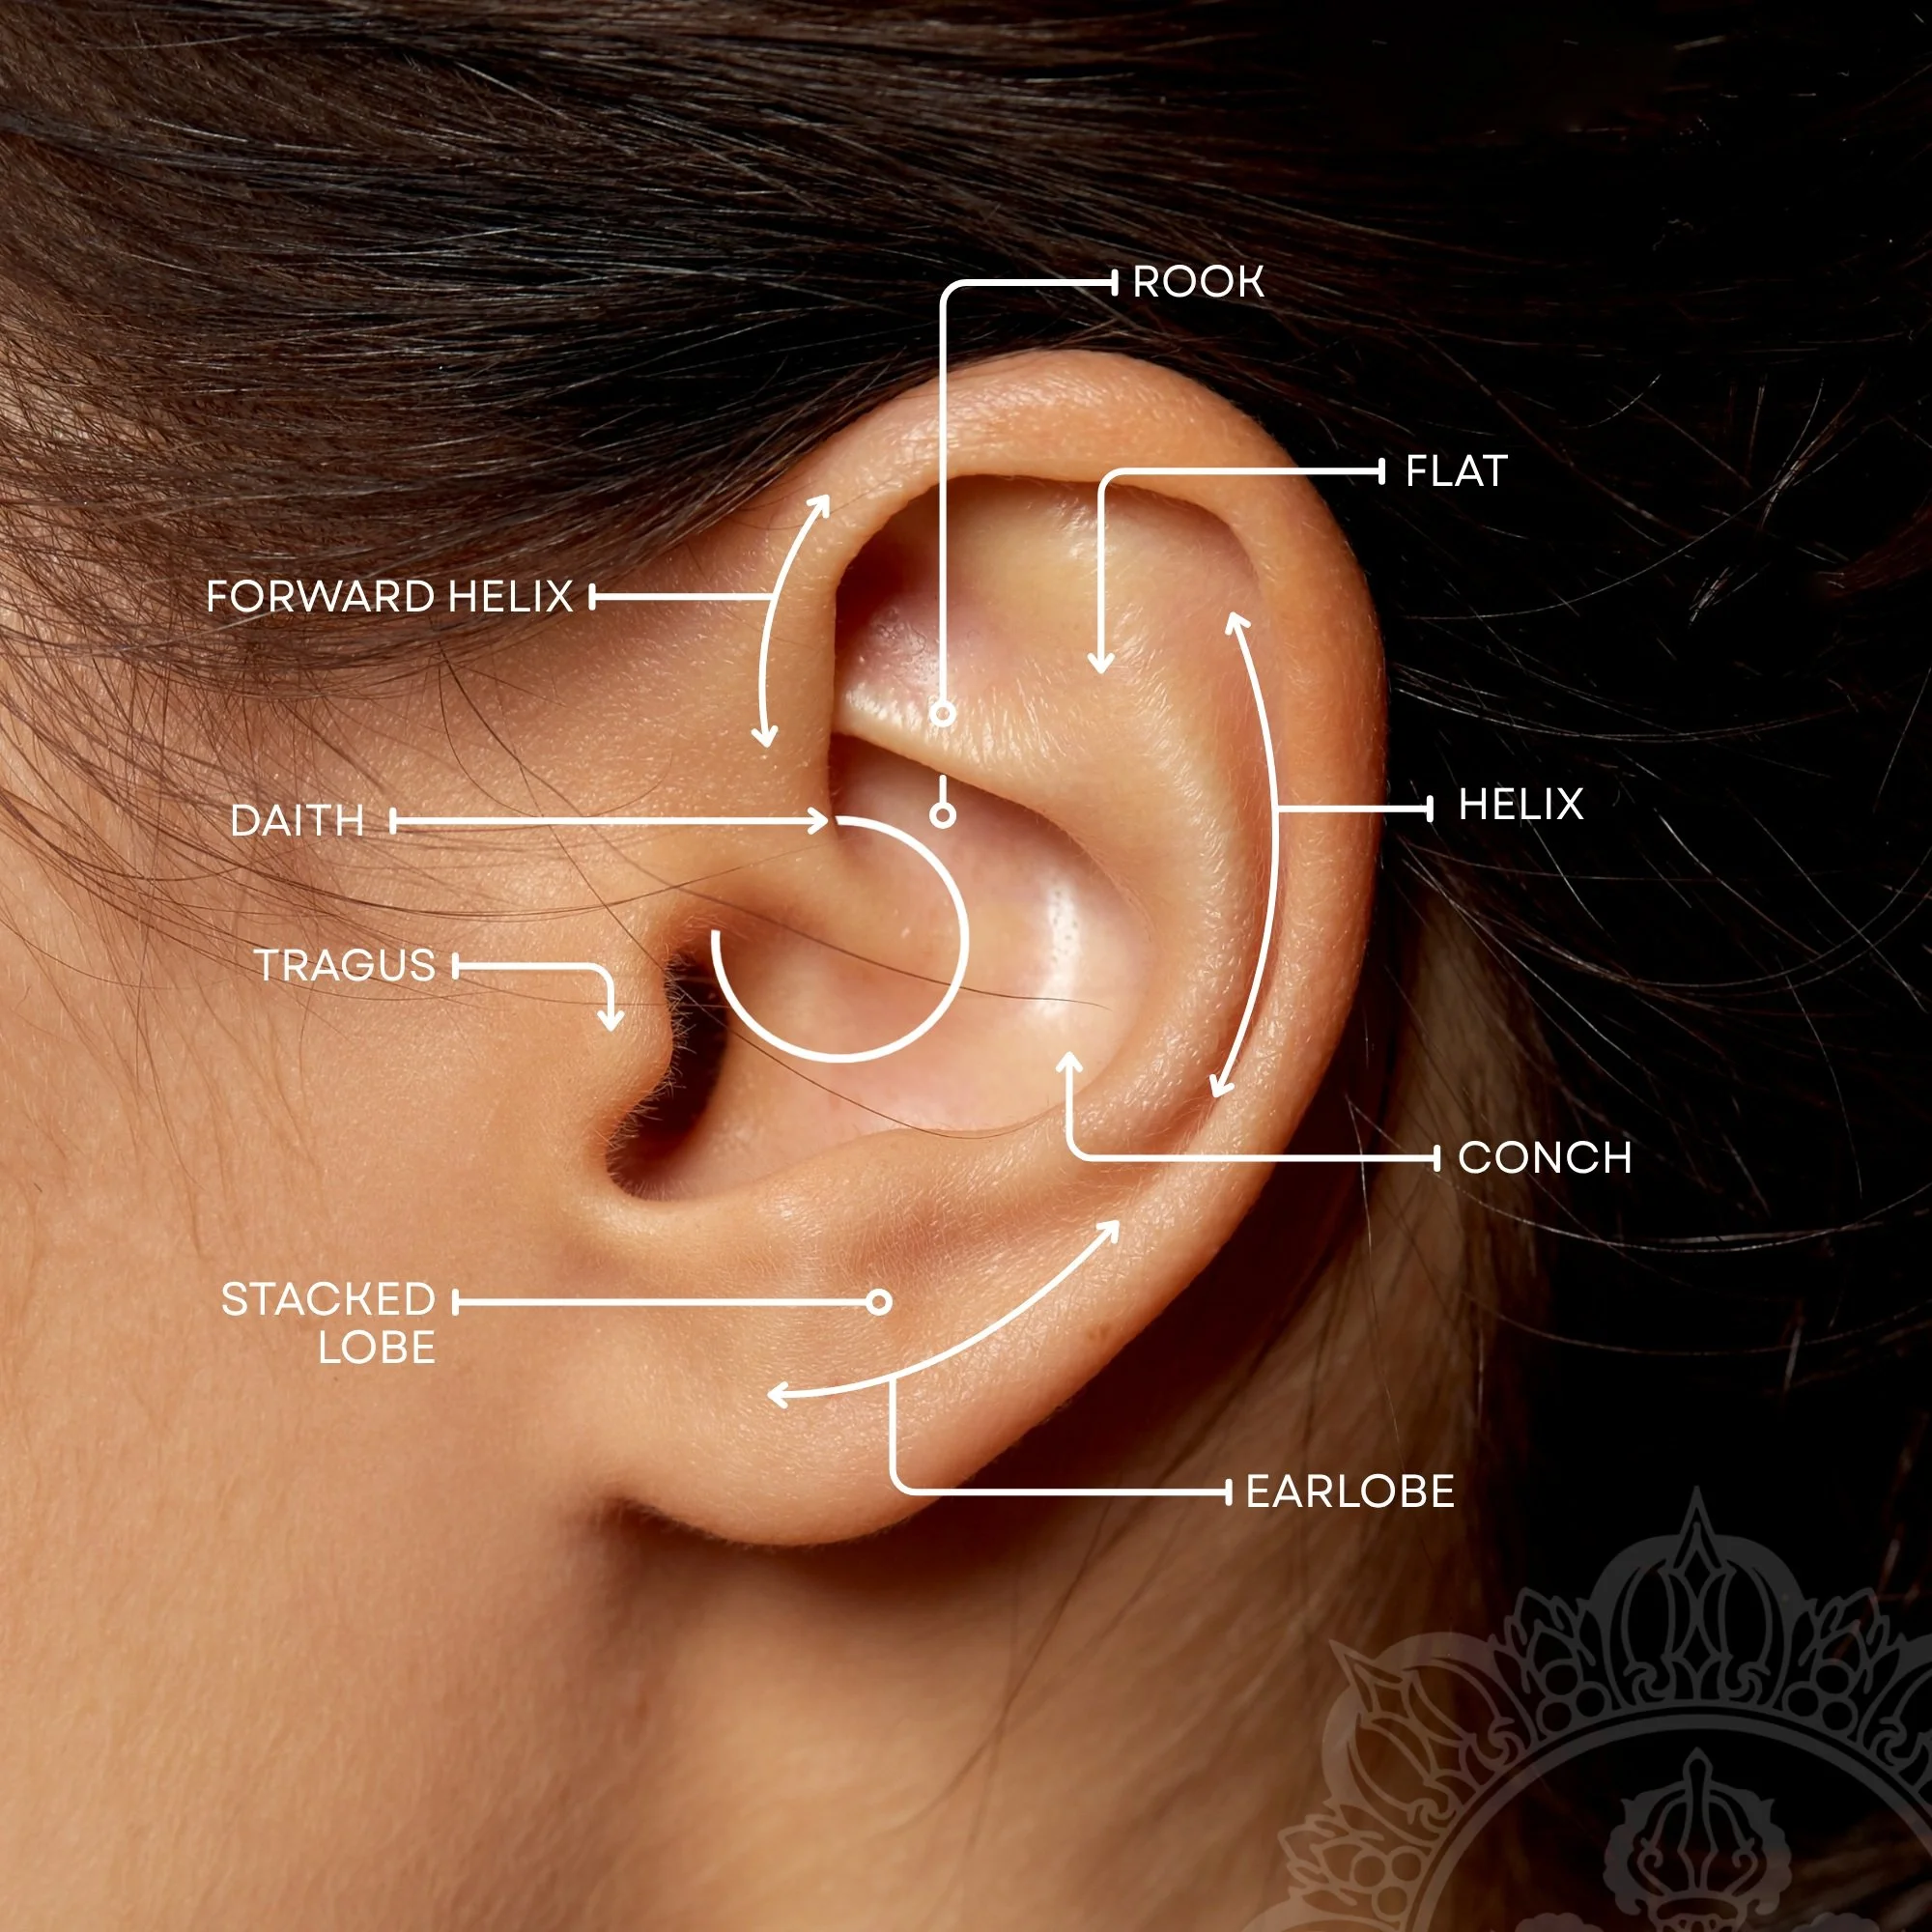
-
Includes earlobe and stacked earlobe piercings.
Time it takes to:
Heal: 4-6 months
Downsize: 2 months
Switch to a hoop: 6+ months -
Time it takes to:
Heal: 9-12 months
Downsize: 3 months
Switch to a hoop: 12+ months -
Time it takes to:
Heal: 9-12 months
Downsize: 3 months
Switch to a hoop: 12+ months -
Time it takes to:
Heal: 9-12 months
Downsize: 3 months
Switch to a hoop: 12+ months -
Time it takes to:
Heal: 9-12 months
Downsize: 3 months
Switch to a hoop: 12+ months -
Time it takes to:
Heal: 9-12 months
Downsize: 3 months
Switch to a hoop: 12+ months -
Time it takes to:
Heal: 9-12 months
Downsize: N/A
Switch to a hoop: N/A -
Time it takes to:
Heal: 9-12 months
Downsize: N/A
Switch to a hoop: N/A -
Time it takes to:
Heal: 9-12 months
Downsize: 3 months
Switch to a hoop: 12+ months -
Time it takes to:
Heal: 4-6 months
Downsize: 2 months
Switch to a hoop: 6+ monthsTo best determine a timeline for you to continue stretching your piercing once it’s healed, please reach out to your piercer.
-
Time it takes to:
Heal: 12-18+ months
Downsize: 3 months
Switch to a hoop: 18+ months -
Time it takes to:
Heal: 12-18+ months
Downsize: 3 months
Switch to a hoop: 18+ months -
Time it takes to:
Heal: 12-18+ months
Downsize: 3 months
Switch to a hoop: 18+ months

-
Time it takes to:
Heal: 9-12 months
Downsize: 2 months
Switch to a hoop: 12+ months -
Time it takes to:
Heal: 3-4 months
Downsize: N/A
Switch to a hoop: N/A -
Time it takes to:
Heal: 3-4 months
Downsize: 2 months
Switch to a hoop: 4+ months -
Time it takes to:
Heal: 3-4 months
Downsize: 3 weeks
Switch to a hoop: 6+ months -
Time it takes to:
Heal: 3-4 months
Downsize: 3 weeks
Switch to a hoop: 6+ months -
Time it takes to:
Heal: 12 months
Downsize: 2 months
Switch to a hoop: N/A -
Time it takes to:
Heal: 2 months
Downsize: 3 weeks
Switch to a hoop: N/A

-
Time it takes to:
Heal: 9-12 months
Downsize: 3 weeks
Switch to a hoop: 12+ months -
Time it takes to:
Heal: 9-12 months
Downsize: 3 months
Switch to a hoop: 12+ months